
Each time you hire a new employee, you are responsible for verifying they are eligible to work in the United States. To do this, use Form I-9, Employment Eligibility Verification, when onboarding new hires. All U.S. employers are required to use the I-9. Failing to do so can result in penalties. Learn how to fill out Form I-9 to stay compliant.
What is an I-9?
Form I-9 is a mandatory form that confirms your employees are legally allowed to work in the U.S. The form verifies an employee’s identity and employment authorization. Both employers and employees in all states must fill out Form I-9 at the beginning of employment. And, the employee must present acceptable I-9 documents for you to review and verify.
The I-9 is a form from the U.S. Citizenship and Immigration Services (USCIS). You must have a USCIS Form I-9 in your payroll records for each employee you hire.
The USCIS released the most recent version of Form I-9 on August 1, 2023. Employers must use this revised version of the I-9, which has additional parts than previous versions.
How to fill out Form I-9 section by section
If you’re an employer or plan on becoming an employer, learn how to complete I-9.
| Did You Know? |
|---|
| You must use the most up-to-date version of the I-9 form. You can find the most current version of Form I-9 on the USCIS website. The form is fillable, which saves you from having to print a blank form and write your answers by hand! |
How many sections are on the I-9 form? There are four parts to the most recent version of the I-9:
- Section 1, Employee Information and Attestation
- Section 2, Employer Review and Verification
- Supplement A, Preparer and/or Translator Certification for Section 1
- Supplement B, Reverification and Rehire (formerly Section 3)
Check out a part-by-part breakdown below to learn how to fill out an I-9.
Section 1, Employee Information and Attestation
The employee fills out and signs Section 1 no later than their first day of employment.
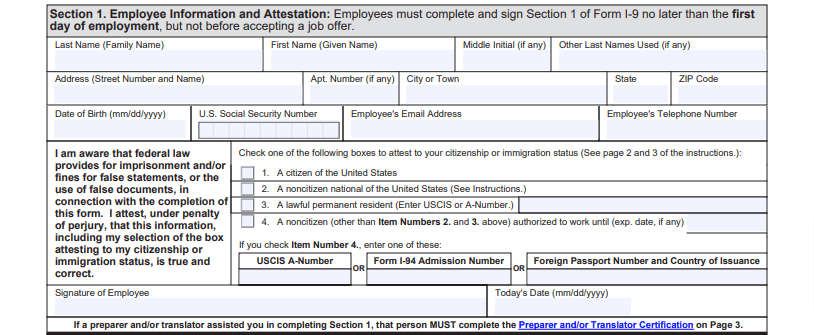
Section 1 asks employees to enter their:
- Full name
- Address
- Date of birth
- Social Security number (voluntary, but employers participating in the E-verify program can require it)
- Email address
- Phone number
- Citizenship details
Employees must also sign and date Section 1.
Does the employee use a preparer and/or translator to help them complete Section 1? The preparer and/or translator must complete Supplement A (more information below).
Section 2, Employer Review and Verification
The employer completes and signs Section 2 within three business days of the employee’s first day of work.
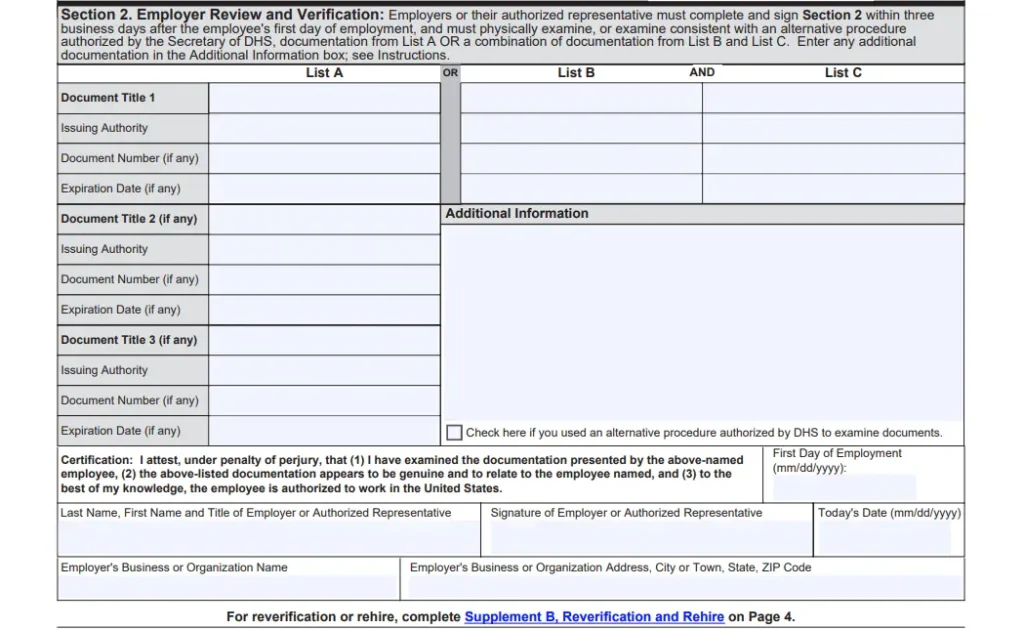
To fill out this section, you need one or more documents from your new employee (e.g., passport). The document(s) must prove the employee’s identity and U.S. employment authorization. The USCIS provides a list of I-9 acceptable documents for employees to choose from. Employers cannot specify which document(s) the employee must present.
It’s your job to examine the document(s) to ensure it matches what is listed on Form I-9 and verify it’s genuine.
You can choose to make a photocopy of the employee’s document(s) for your records, but the USCIS does not require it. However, you must be consistent. If you make a photocopy for one employee, you must do so for all new hires.
After you gather the document(s) from the employee and have examined that it is legitimate, record the following in Section 2:
- Document title
- Issuing authority
- Document number (if applicable)
- Expiration date (if applicable)
You must also enter the employee’s first date of employment, your name and title, your business name and address, and today’s date. Sign Section 2.
Is your employee remote? You may be able to remotely examine the employee’s identity and employment authorization document(s) under a DHS-authorized alternative procedure. You must be enrolled in good standing in E-Verify to qualify. If you go this route, check the box next to “Check here if you used an alternative procedure authorized by DHS to examine documents.” To learn more about remote document examination and requirements, check out the USCIS website.
I-9 verification documents
The I-9 acceptable documents are grouped into three lists: List A, List B, and List C.
List A requires documents that prove both identity and work eligibility. This includes a passport, Permanent Resident Card, and foreign passport.
List B includes documents that prove identity only. Examples of acceptable I-9 identification from List B include a driver’s license, government-issued ID card, U.S. Military card, and school ID card. If you use E-Verify, the List B document must include a photograph of the employee.
List C includes documents that prove work eligibility only. Acceptable identification from List C includes a Social Security account number card, birth certificate, and U.S. citizen ID card.
To prove their identity and citizenship, employees can either show:
- One document from List A OR
- A document from both List B and List C (two documents total)
Again, your employees can choose which documents to bring. Remind new hires to bring documentation within three days of their first day.
There is also a section of acceptable receipts, which employees can use temporarily instead of accepted I-9 verification documents. For example, an employee whose passport is lost or stolen can provide a receipt for their replacement.
You can view a complete I-9 documents list on page 2 of the Form I-9 PDF.
Supplement A, Preparer and/or Translator Certification for Section 1
Supplement A is a new, standalone section on the most recent version of Form I-9. Previously, the Preparer and/or Translator Certification Area was part of Section 1.
This section is only used if the employee uses a preparer and/or translator to help them complete Section 1.
Each preparer or translator must enter their name and address, as well as sign and date a separate certification area in Supplement A.
Supplement B, Reverification and Rehire (formerly Section 3)
Supplement B replaced Section 3 on the previous version of Form I-9. Only fill out Supplement B, Reverification and Rehires, if:
- The employee’s employment authorization requires reverification
- The employee provides proof of a legal name change
- You’re rehiring a former employee*
*If you rehire an employee within three years of when you first filled out Form I-9, you can fill out Supplement B or complete a new Form I-9. You must complete a new Form I-9 if you’re rehiring the employee more than three years after you first filled out the original I-9.
Common Form I-9 errors
Like anything, mistakes happen. But when you discover an error, you need to know how to correct an I-9 form and act quickly. Employers may be penalized for incomplete or inaccurate information.
Here are just a few common errors on Form I-9:
- You or the employee listed information in the wrong box
- The employee didn’t fill out Section 1
- You accepted unacceptable documents
- You or the employee forgot to sign and date the form
- Dates or addresses are missing on the form
For more information on how to correct errors or missing information on the I-9, consult the USCIS website.
Should you E-Verify I-9?
E-Verify is a free and (mostly) voluntary program employers can use to double-check an employee’s employment authorization. The new hire must provide their Social Security number for you to use E-Verify.
If you use E-Verify, input information from Form I-9 into the system. The system then compares I-9 information to the Department of Homeland Security’s and Social Security Administration’s records.
For the most part, E-Verify is voluntary. However, there are exceptions. Some states (e.g., Arizona) may require employers to use E-Verify. Employers with federal contracts or subcontracts might also be required to use E-Verify.
Form I-9 recordkeeping
You must keep paper or electronic Forms I-9 in your records for each person on your payroll in the United States.
Do not send Form I-9 to the U.S. Citizenship and Immigration Services (USCIS) or U.S. Immigrations and Customs Enforcement (ICE). Don’t send it anywhere. The I-9 is for your records only.
Safely and securely store Form I-9 along with all supplemental pages and document photocopies (if applicable). You must keep these documents for as long as the employee works for you. After employment ends, continue keeping the form in your records for one year or three years after the first day of employment (whichever is later).
Although you do not send the form to a government agency, you must make the form available for inspection. Authorized U.S. government officials from the Department of Homeland Security, Department of Labor, or Department of Justice can request to inspect Forms I-9.
When you hire a new employee, don’t forget to add them to your payroll! Patriot’s payroll makes adding new employees a breeze. And, our HR software add-on is perfect for tracking employees’ employment history and storing new hire documents. Try both for free today!
This article has been updated from its original publication date of July 30, 2010.
This is not intended as legal advice; for more information, please click here.