How to Add Companywide or Employee Documents
In this article:
Background
With Patriot HR Software, you can manage and share documents with employees by uploading them as Company-wide Documents, such as a company handbook, or Individual Employee Documents like performance reviews and confidential memos. Documents you share appear to employees in their employee portal. Documents you upload and choose not to share will only be viewable for admins.
Employees can also upload and share documents within their employee portal. See our help article for Viewing and Managing Documents in the Employee Portal for more information.
💡 You can create a custom Employee Handbook in the HR Center! It’s free for customers who subscribe to Patriot HR.
Don’t have the HR Software yet? Try it free Settings > Company Settings > Add or Cancel Software.
Adding and Sharing a Companywide Document or Link
- Go to Payroll > Human Resources > Employee Documents
- Select the Companywide tab
- Click “+Add Document.”
- Upload the document
- In the pop-up window:
- Enter a friendly Document Name (e.g., Employee Handbook.) This will be displayed to your employees.
- Select the Document Type:
- Choose File to upload a document.
- Choose Website to link an external URL.
- To upload a file, choose File and drag a file to the upload box or click the Choose File button and find the file.
- To add a link to a website, choose Website and enter the website address. You can click “Test Link” to make sure the link works. The web page will appear in a new window.
- In the pop-up window:
- Enable the checkbox labeled Display to employees to make the document visible, otherwise, this document will be visible for admins only.
- You will also be able to manage the display of documents on the document list.
- Click the “Add Document” button.

Adding Documents to an Individual Employee Record
- Go to Payroll > Employee List > {Employee Name} > Documents
- Click +Add Document.
- Upload the Document
- In the pop-up window:
- Enter a Document Name (e.g., “Employee Handbook”).
- Select Document Type:
- Choose File to upload a document from your computer.
- Choose Website to link an external URL.
- Drag and drop your file into the upload area or click Choose a File to browse your computer.
- Make sure the document is in an acceptable format (e.g., .pdf, .docx, .jpg).
- In the pop-up window:
- Click the checkbox labeled “Display to employee” to make the document visible, otherwise this file will be for admins to view only.
- For Document Type:
- To upload a file, choose File and drag a file to the upload box or click the Choose File button and find the file.
- To add a link to a website, choose Website and enter the website address. You can click “Test Link” to make sure the link works. The web page will appear in a new window.
- Click the “Add Document” button to save the file to the employee record.
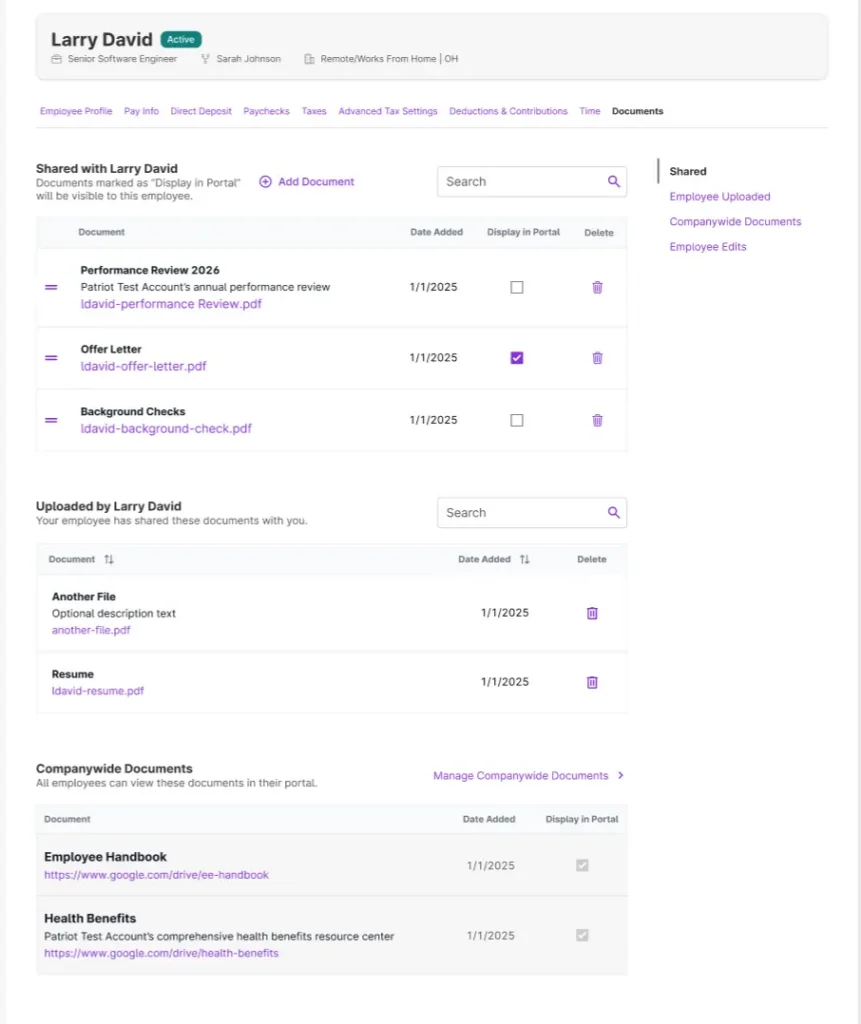
Managing Your Document List
You can view all company shared files and files shared to individual employees in either of these places:
- Payroll > HR Software > Employee Documents – view all shared company and files added to employees as well as if they are displaying in the portal or private files.
- Payroll > Employee List > Employee Name > Documents – view company and files on the individual employee record.
Your document list will display the document links or files when it was uploaded. For individual employee documents, the number of documents shown to each employee.
Reorder Documents and Links
You can reorder the document list to appear in a certain order to employees when they view the documents in their portal.
- Place your cursor at the left of the row, over the 3 blue dots.
- Click and drag the row to another position.
- The update will automatically save.
Delete an Employee Document
- Click the trashcan icon in the row of the document you want to delete permanently.
- 💡 To keep the document as an admin you can simply uncheck the “Display to employee(s)” box.
- Confirm the deletion by clicking the “Delete Document” button in the pop-up modul, otherwise, click “Cancel.”
- This document will no longer appear to the employee through their employee portal or to you as an admin.
Note: You cannot edit an attached document. To make a change, you need to remove the original document and upload the edited document.
How to View Employee Uploaded Documents
Employees can securely share documents to you through their employee portal. You will receive an email when an employee has shared a document with you.
- Go to Payroll > Employee List > {Employee Name} > Documents
- Click the Uploaded by Employee link on the right side navigation.
- Uploaded documents will be in the Uploaded by {Employee Name} section with the most recent upload on top.
- You can sort the documents by date either ascending or descending order.
- You can also search for a document name in the search bar.
- To delete a document shared by the employee, click the trashcan icon.
- A confirmation message will appear. The document will no longer be visible to you or the employee in their portal.
- Click the “Delete Document” button to finalize the action, otherwise, click cancel.
- An email will be sent to the employee that the document was deleted.
Your feedback will not receive a reply. If you have a specific issue, please reach out to our support team here.