Split Imported Bank Transactions
Background
Many times, a single bank transaction, such as a credit card charge, has multiple items that need to be allocated to a different account or department. Splitting the banking transaction on the bank import page allows you to allocate the amount, account, and department (if needed). You can split a transaction for one customer or vendor at a time.
You can split transactions with either a manual bank import or with the automatic bank import after you have connected your bank accounts in the software.
For more details on importing bank transactions, check out these help articles:
Managing Your Imported Bank Transactions
Manually Importing Your Bank Transactions
After your transactions have been imported either automatically or with an uploaded spreadsheet, you will see all of the transactions displayed in the current import. Each bank import will have a total amount of the transaction displayed.
How to Split Transactions on the Bank Import Screen
First, import your bank transactions by going to:
Accounting > Financial Task > Manage Imported Transactions.
To split a bank transaction, either click the “description” of the transaction to expand the box, or the “gear” icon.
- Click the “Split Transaction” icon in the row of the transaction you need to allocate.
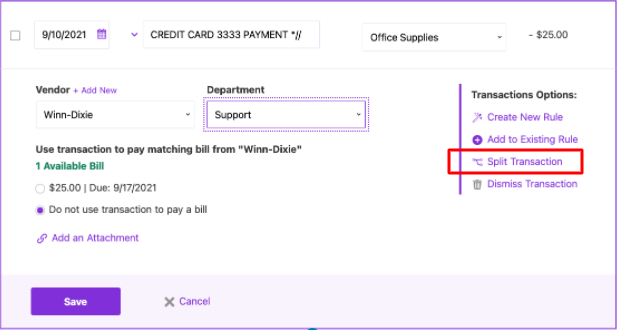
- The section will expand and display entry fields for “Split This Transaction.”
- Select the chart of accounts, department (if applicable), and the amount for the first part of the transaction.
- Continue allocating accounts, departments (if applicable), and the amount for each row of the transaction.
- Click “Add Another Row” if you need to allocate more than two accounts of the transaction.
- Click the “X” at the end of each allocation to remove a row, if needed.
- Once you allocate all of the money for the transaction, click “Apply Changes.”
- You still need to “post” the bank transaction to your software for these entries to be recorded in your accounting software.
Example:
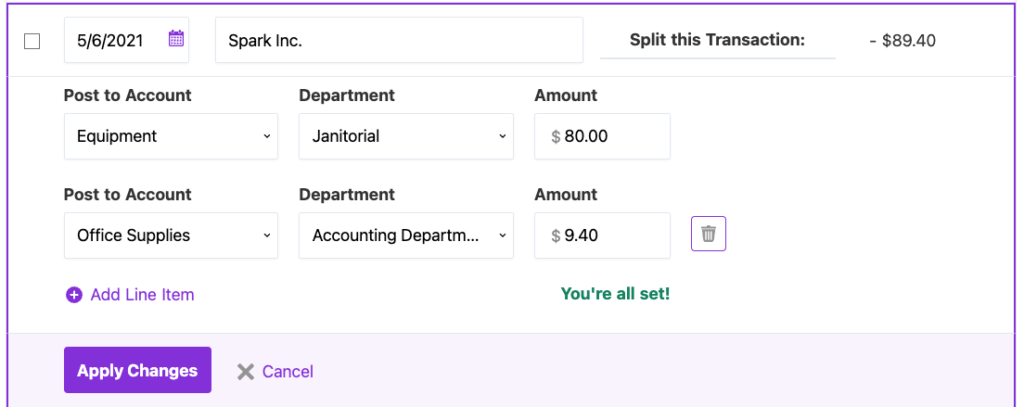
Let’s say you have a bank transaction of $89.40 for Spark Inc. This expense went towards equipment for the janitorial department and copier paper for the accounting department. Click the “Split Transaction” icon to begin allocating the money to the proper accounts and departments (if you have departments set up).
First, we’ll select the expense account (“Equipment”in this case) and indicate that $80 of the bill was for equipment for the Janitorial department.
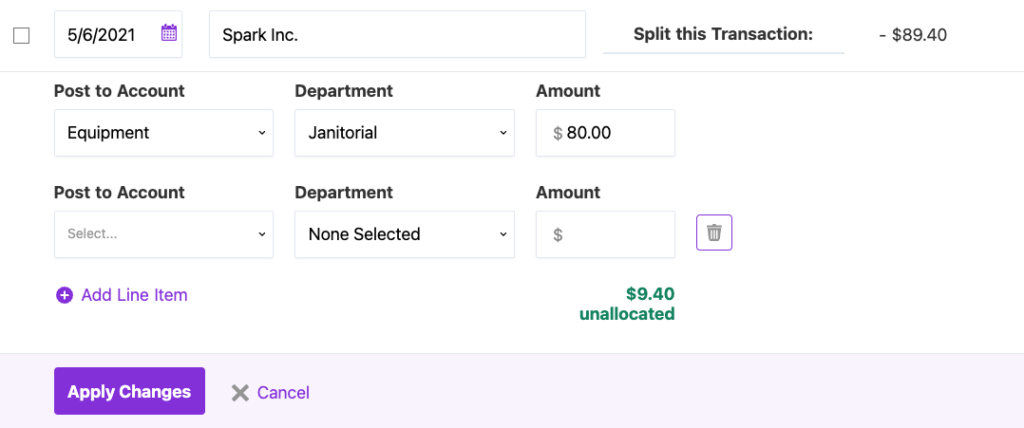
This leaves the remaining $9.40 as uncategorized money. On the second row, you’ll indicate $9.40 is for our expense account “Office Supplies” for the accounting department. Just select the appropriate drop-down.
If you need to add additional allocations, just click the +Add Line Item.
Once all of the money for the transaction has been allocated, click “Apply Changes” to save the split transaction.
After all of your bank transactions are categorized, you will “post” transactions normally.
Be sure to check out our help article, Setting up Imported Transaction Rules, to further simplify managing imported transactions.
Your feedback will not receive a reply. If you have a specific issue, please reach out to our support team here.