Manually Importing Bank Transactions
Background
You can import your bank or credit card transactions into Patriot as often as needed. Choose between:
- Manual imports (uploading a file yourself)
- Automatic imports (connecting your bank for daily updates). For details on setting up an automatic bank feed, see “Connecting Your Bank Accounts for Accounting Journal Entries.“
How to Manually Import Bank Transactions
Step 1: Download Your Transactions File
- Log in to your online bank account.
- Download a file containing your bank transactions.
- Select CSV or Excel format and save it to your computer.
Step 2: Upload Your File to Patriot
- Go to Accounting > Financial Tasks > Manage Imported Transactions.
- Click Manually Import Transactions.
- Select the bank or credit card account you want to import transactions into.
- Upload your file by either:
- Dragging and dropping it
- Clicking to browse and select it
- If your file does not have a header row, uncheck the box labeled “The first row in my file is a header row.” Otherwise, leave it checked.
- Click “Continue.”
Step 3: Match Your Data to Patriot’s Fields
- Match the displayed columns on your file to the correct Patriot fields:
- Post Date
- Description
- Amount
- Amount 2 (if applicable)
- Leave any extra columns unselected.
- Click “Continue” when finished.
Step 4: Review and Manage Your Imported Transactions
- You can accept, dismiss, or categorize transactions.
- Need more help? Check out Managing Your Imported Bank Transactions.
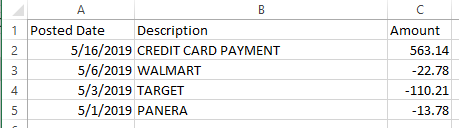
Here is a sample of downloaded activity from a credit card account. Keep in mind, you can have two amount columns, but any more columns will not be imported into the software.
FAQs About the Bank import File Format
.xls, .xlsx, .csv
You can import the Post Date, Description, Amount, and Amount 2 (if your bank exports deposits/withdrawals as two separate columns). Any other fields in the file will not be imported.
Your import file needs to include all three items: the Post Date, Description, and up to two Amount columns (if your bank exports deposits/withdrawals as two separate columns.)
Although the file limit is 300 transactions, we recommend you limit your file to 200 entries or less for each upload.
Each bank transaction record should be on a single row in your file, with a column for each field to import. The first row of your file can include a header that labels each column, but it is not required. You can indicate if your file does not have a header row. You cannot have any extra lines, borders, or footers in your file.
No, the fields (columns) can be in any order from your bank or former software. You’ll match the fields to our fields after you import the file
Your feedback will not receive a reply. If you have a specific issue, please reach out to our support team here.